WordPress to Shopify Migration: A Comprehensive 10 Steps Guide
This guide is crafted to simplify your migration journey from WordPress to Shopify, addressing common concerns and outlining a clear path for transferring your data. By breaking down the process into manageable steps and providing insights into setting up shop on Shopify.


This guide walks you through the WordPress to Shopify migration process step by step. We'll cover:
Why you might want to move to Shopify
How to prepare for the migration
A 10-step process to transfer your data and set up your new store
Common challenges and how to overcome them
Whether you're a store owner, a developer, or a project manager, this guide will help you understand what's involved in migrating to Shopify. We'll go beyond just using migration apps or CSV files, giving you a complete picture of the process.
By the end of this read, you'll have a clear roadmap for your WordPress to Shopify migration. Let's get started.
Why Migrate to Shopify?
Moving your online store from WordPress to Shopify can be a significant step towards scaling your business and enhancing its operational efficiency. Here's why Shopify stands out as a favorable choice for your e-commerce needs:
Embrace Built-in Analytics for Informed Decisions
Shopify's integrated analytics features are a game-changer for monitoring your e-commerce website's performance. Understanding product trends, identifying sales patterns, and pinpointing areas for improvement are crucial for growth.
With Shopify, you gain insights into underperforming products, bestsellers, and abandoned cart details, equipping you with the data needed to make informed business decisions.
Simplified Payment Processing
One of the standout features of Shopify is its native payment solution, Shopify Payments. This eliminates the need for third-party payment gateways, streamlining the checkout process for your customers.
Shopify Payments supports multiple major credit cards and offers the convenience of paying in local currencies, making it easier for you to expand your market reach without complicating the payment process.
However, Shopify’s versatility shines the most when it’s implemented with a headless commerce approach. Adopting Shopify in a headless setup allows for the integration of diverse third-party payment systems for Shopify such as PayPal, Apple Pay, Amazon Pay, or Stripe. This ensures businesses can offer customized checkout experiences and cater to regional payment preferences.
Access to Extensive App Marketplace
Shopify's app ecosystem is vast, with over 7,000 apps available to customize and enhance your online store. Unlike WordPress, where reliance on plugins can sometimes slow down your site, Shopify's apps are designed to integrate seamlessly, ensuring your site remains fast and responsive.
Whether you're looking to add advanced product options, improve your marketing, or streamline your shipping processes, there's likely a Shopify app that meets your needs.
Moreover, the platform offers the flexibility to create Shopify apps tailored to your specific requirements. This means you can develop bespoke solutions to fill any gaps in functionality or to provide unique features that differentiate your store.
See how we deliver Shopify migration solutions that empower you to grow
Learn more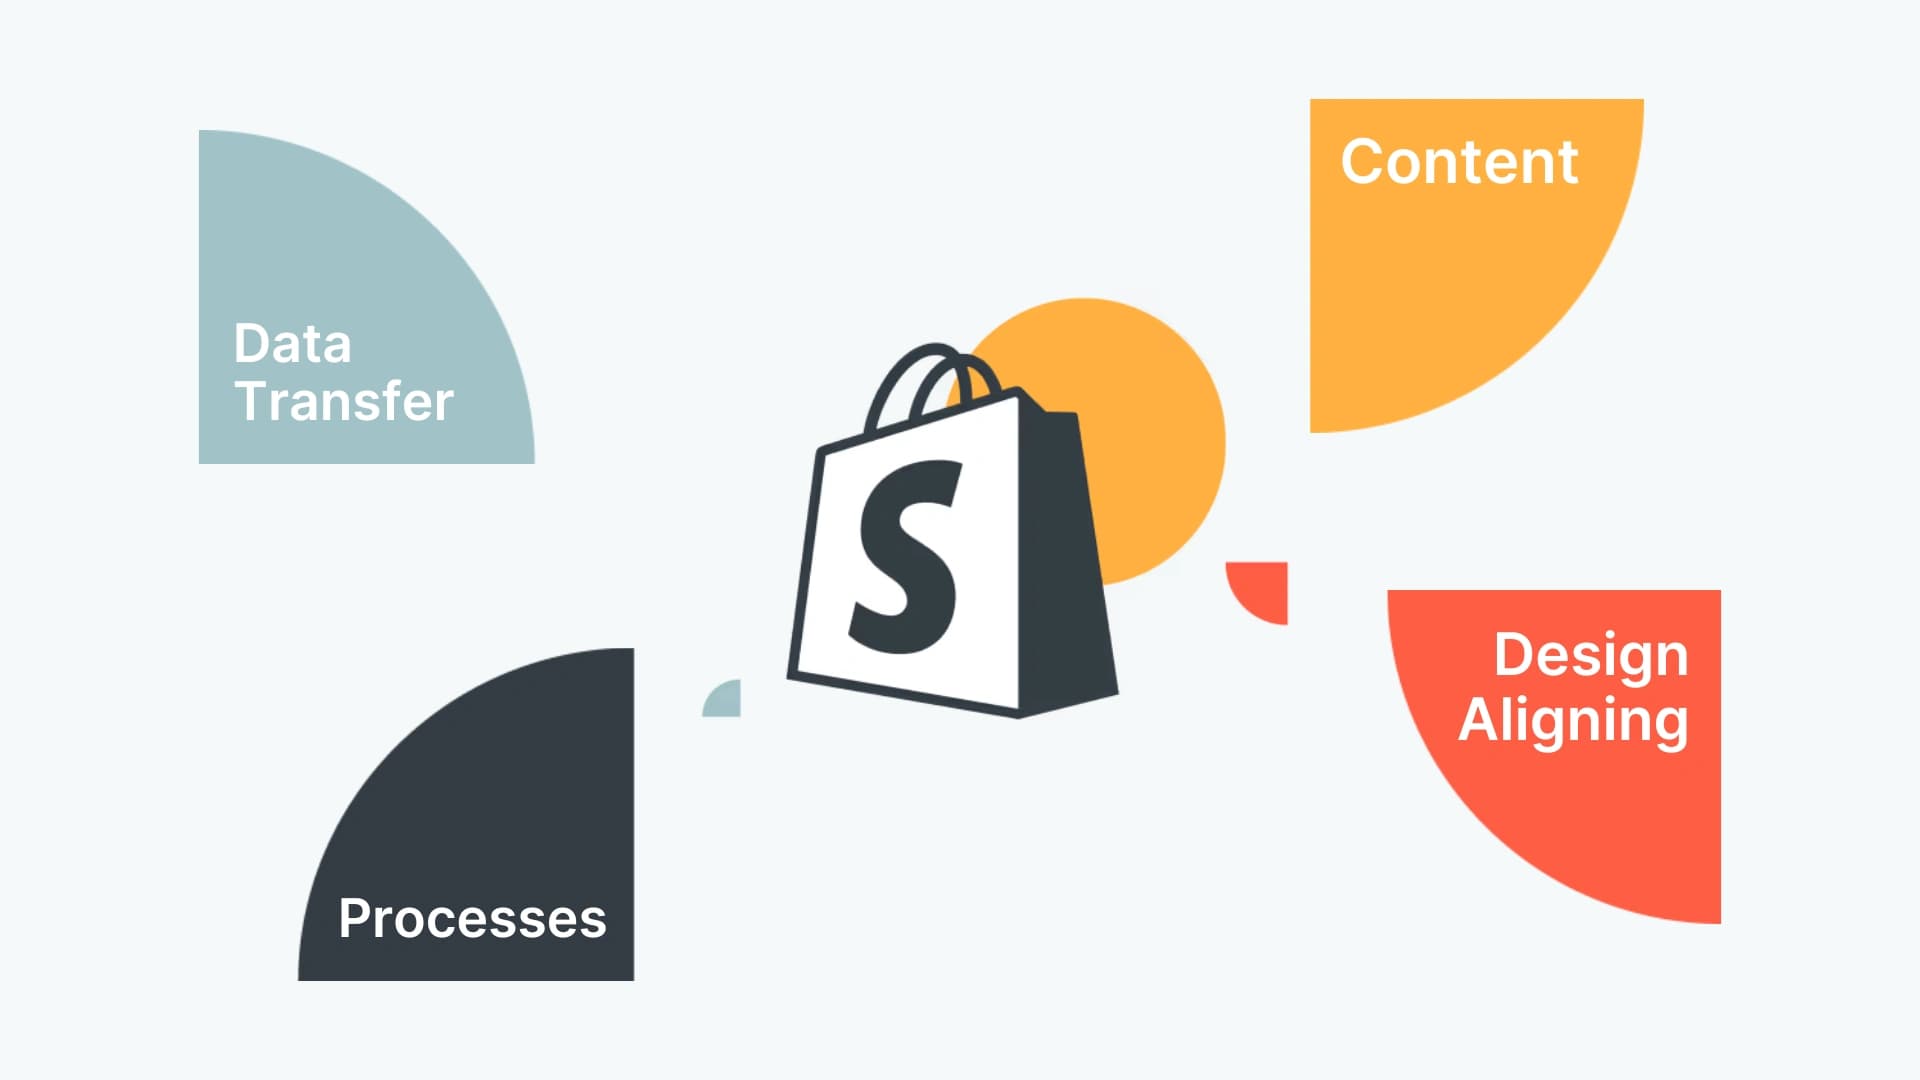
Preparing for WordPress to Shopify Migration
A quick reminder before we start: you have a great choice for your CMS migration project. It doesn't necessarily need to be a Shopify you'd benefit from the most, but... it's a great pick anyway!
Transitioning from WordPress to Shopify can be a seamless process with the right preparation.
Here’s how you can ensure a smooth transfer:
1. Backup Your WordPress Site
Before you start the migration, it's essential to secure your data. Create a comprehensive backup of your WordPress site, including website files, themes, plugins, and databases. Utilize a reliable WordPress backup plugin and store the backup securely, either on cloud storage or an external drive. This step is crucial to safeguard your content against any unexpected issues during the migration.
2. Set Up Your Shopify Account
Your new Shopify account will be the cornerstone of your online business moving forward.
Here’s how to set it up:
Sign Up for Shopify: Visit the Shopify website and sign up by providing your store name, email, and choosing a password.
Explore Shopify Plans: Shopify has four different plans to suit various business needs and budgets, ranging from $39 to over $2,000. Evaluate your business requirements and select the most appropriate plan.
Take Advantage of the Trial: Shopify offers a free trial and occasionally, special deals like $1/month for the first month. Use this opportunity to determine which plan fits your business best.
3. SEO Preparation and Cleanup
To maintain your site's SEO ranking and provide a seamless user experience, consider the following:
Redirection Map: Develop a redirection map for URLs from your WordPress site to Shopify. Utilize Shopify’s URL redirects feature or third-party apps for complex redirections. Update any internal links in your content to point to the new Shopify URLs.
Meta Tags (Title and Descriptions Export): Export meta tags from your WordPress site, as they play a crucial role in SEO. Optimize these for your Shopify store to accurately reflect your products and content.
Content Cleanup: Review your existing content for outdated, irrelevant, or duplicate material. Delete unnecessary content to streamline your new site. This not only ensures a cleaner store but also enhances user experience.
Step 1: Importing Your Store's Content And Data to Shopify
Migrating the vast expanse of data from WordPress to Shopify can appear as a herculean task. Yet, this extensive process forms the backbone of your store's digital relocation. Data and content transport demands meticulous attention, but with a systematic approach, the ordeal can be significantly streamlined.
Data to Consider Migrating
To begin, itemize the data sets crucial for your Shopify venture
Products: These are the backbone of your store. Ensure to include all details like images, descriptions, and prices.
Customers: Your customers' information is crucial for maintaining relationships and ensuring seamless service continuation.
Historical Orders: Previous orders provide insights into customer behavior and sales trends, which are invaluable for your new Shopify store.
Gift Cards and Store Credits: If you have an existing loyalty program, this data will help maintain continuity for your customers.
Blogs: They are key for SEO and customer engagement; ensure they're included in the migration.
Site Pages: Pages like 'Contact Us', 'About Us', and your 'Shipping Policy' is essential for customer trust and legal compliance.
Navigating Through Migration Methods
Shopify Migration App: These applications employ APIs, allowing for a bulk transfer of your store's essence. Blog posts, product listings, and customer data – all moved in unison. Exploring the Shopify App Store reveals a spectrum of apps, from gratis to premium, catering to migrations from various platforms, not limited to WordPress. Popular choices like Litextension epitomize efficiency in this context. Set your source as WordPress, target Shopify, input your URL, select the data for migration, and initiate the process – a seamless transition awaits.
Manual Transfer via CSV Files: If granular control is your preference, CSV files are your allies. Acting as containers for your textual data, these files enable the manual shifting of products and clientele details. WordPress's rich repository of plugins presents numerous export options akin to migrations from Wix or Squarespace. Having garnered your CSVs, the next steps unfold in the Shopify Merchant Dashboard:
Venture into the Products section.
Locate and engage the Import function.
Upload your WordPress-generated CSV, preview your product specifics, and upon satisfaction, proceed with the import.
Note: each data migration method has its potential pitfalls, from incomplete data transfer to technical errors that could disrupt your business continuity. This is where the expertise of a web development team becomes invaluable.
With their involvement, custom data fields, unique store functionalities, or SEO metadata will be accurately transferred without loss or disruption and adapted to Shopify’s platform.
Deciding on the Right Migration Path
Your migration strategy hinges on the scale and complexity of your online store. High-volume inventories and extensive blogging content are prime candidates for the efficiency of a migration app or an e-commerce consulting agency involvement. Conversely, if your store is more boutique, with a curated selection of products and minimal blog content, the simplicity of CSV file transfer might just be the perfect fit.
No matter how you choose to move your store, always back up your data first. It's like insurance for your business. If anything goes wrong during the move, you'll have a copy of everything. Don't skip this step - it's too important.
Best CMS for Shopify: Top Headless CMS Options
For most brands, the best Shopify CMS is one that extends Shopify’s native capabilities with flexible content modeling, omnichannel publishing, and strong headless support. Platforms like Contentful, Sanity, and Storyblok are popular choices for content-rich and fast-growing Shopify stores because they enable marketers and developers to manage dynamic storefront experiences more efficiently than Shopify’s built-in CMS alone.
CHECK THE ARTICLE
Step 2: Selecting the Perfect Shopify Theme
As you move from WordPress to Shopify, it's important to note that themes are not transferable between the platforms. This means a fresh opportunity to redefine your online store's appearance with a new Shopify theme that aligns with your brand.
Initially, your store will sport Shopify's default theme, but the platform's robust library of themes – both free and paid – awaits to give your store a makeover that resonates with your brand identity.
A New Look with Free Themes
To select a free, Shopify-developed theme:
Navigate to the Online Stores section found on the left side of your Shopify Merchant Dashboard.
Scroll down to Free Themes and click on Explore to unveil a variety of theme options.
Browse through the themes, click to preview those that pique your interest, and visualize them in action.
When you're drawn to a theme, hit the Add button, and it will appear in your Theme Library, ready for customization.
Investing in a Premium Theme
For a paid theme:
Visit the Shopify Theme Store to explore themes that encapsulate your store's essence.
Utilize the Preview option to experiment with the theme before purchasing.
If you decide it's the right fit, close the preview, select Buy Theme, and proceed to purchase.
Post-purchase, dive into customization to tailor the theme to your unique specifications.
Remember, while Shopify themes offer extensive customization options, you might occasionally need something extra – a feature that captures the uniqueness of your brand.
In such cases, consider enlisting a developer to make those specialized adjustments, ensuring your store not only looks great but also provides a unique shopping experience for your customers.
Going For A Custom Shopify Theme
Going beyond standard themes, custom Shopify theme development leverages the skill of specialists to mirror your brand's unique ethos and functionality needs.
Why Opt for a Custom Theme?
Unique Design: A good Shopify development agency can craft a distinct look that sets your brand apart.
Advanced Features: Custom functionalities not available in pre-made themes can be integrated to enhance user experience.
Speed and SEO: Bespoke themes are optimized for performance, aiding in faster load times and potentially better search rankings.
Dedicated Support: Experts offer ongoing technical support, keeping your store running without a hitch.
Brand Storytelling: A custom theme is a canvas for your brand narrative, offering a compelling and cohesive shopping experience.
UX/UI Good Practices: After a proper UX audit, you can modify the navigation or UI for a more friendly user experience and better conversions.
A custom Shopify storefront is an investment that transcends aesthetics, creating an optimized shop that embodies your brand and engages customers on a deeper level.
Nerdy Banana’s manual order processing hindered their efficiency and customer experience. Happily, we helped them increase conversion rates, delivery times, and sales.
3x
Quicker delivery times
95%
Production lead time saved
98%
Faster file preparation time

Step 3: Going Headless for Ultimate Theme Customization
Yet, for those aiming for the pinnacle of customization and performance, transitioning to a headless Shopify configuration represents the most advanced and flexible option. This approach decouples the front end from the Shopify back end, allowing for the use of powerful front-end frameworks like Next.js.
Here’s why considering headless Shopify with a custom theme is the optimal choice:
Ultimate Customization: Headless Shopify unlocks the potential for bespoke front-end designs that are not constrained by traditional e-commerce templates, offering unparalleled brand differentiation.
Enhanced Performance: Leveraging modern frontend technologies like Next.js for e-commerce can significantly improve your site's speed and user experience, directly impacting SEO and conversion rates.
Innovative Features: This setup enables the integration of advanced features and dynamic content, providing a more engaging and personalized shopping experience.
Scalability and Flexibility: Headless Shopify is ideal for brands looking to scale, offering the flexibility to adapt and expand your online presence quickly as your business grows.
With this approach, it’s possible to migrate your current WordPress theme. This will take some work and will not always be a great deal – yet it’s doable.
Step 4: Configuring Your Shopify Shipping Setup
Before your Shopify store goes live, fine-tuning your shipping setup is vital to avoid post-launch hiccups, such as refunding customers for overcharges or requesting additional payments to cover underestimated shipping costs.
Whether you're dispatching physical goods or offering digital products and services, configuring your shipping settings is a step you cannot afford to overlook.
Accurate Shipping for a Smooth Launch
Verify Store Address: Ensure your store's address is correct to receive precise shipping rates. If you dispatch from multiple locations, remember to list each to keep rates accurate.
Define Shipping Zones: Establish zones for different geographical regions, states, or countries you plan to ship to.
Carrier-Calculated Rates: If you're using carriers that calculate shipping based on package dimensions, input the height, weight, and depth to determine the volumetric weight for correct rate calculation.
Implement Shipping Rates: Assign appropriate rates to each of your shipping zones.
Choose a Shipping Strategy: Consider your business model and customer expectations to pick the most suitable shipping strategy. Research and comparison will guide you in this decision.
Order Fulfillment: Decide on your fulfillment method. If you're not self-fulfilling, partner with a fulfillment service to manage shipping on your behalf.
For those selling non-physical goods, remember to disable the shipping option since your customers won't be expecting any physical deliveries.
By taking these preparatory steps, you ensure that once your store starts receiving orders, you're ready to deliver with efficiency and accuracy, keeping your customers satisfied and your operations smooth.
Step 5: Tax Configuration on Shopify
Setting up sales tax is an essential but complex aspect of your Shopify store management. Your tax obligations will vary based on your location and the rules specific to the products you sell. It's crucial to invest time in understanding and implementing Shopify's tax setup to ensure compliance with local and international tax laws.
Automating Sales Tax Calculation
Tax by Destination: Shopify simplifies the tax calculation process by automatically applying the correct sales tax based on your customer’s location, aligning with regional tax laws.
Manual Adjustments: For regions with unique tax laws or for specific product collections that require different tax rates, Shopify allows you to make manual overrides to the standard tax settings.
Efficient Tax Management
Tracking and Reporting: Once your tax settings are in place, consider how you will monitor and report taxes. Accurate tracking throughout the year is crucial for reporting and compliance.
Accounting Apps: If you’re uncertain about the best approach for tax tracking, explore the accounting apps available in the Shopify App Store. These apps can automate and streamline tax reporting, making it easier to maintain accurate records.
Taking the time to properly set up and understand your tax obligations on Shopify will save you from potential headaches and legal issues in the long run. Remember, when in doubt, consulting with a tax professional can provide clarity and ensure that your store remains compliant with tax regulations.
Step 6: Setting Up Your Shopify Payment Gateways
Upon migrating to Shopify, establishing your payment providers is a critical step to ensure you can start receiving payments immediately. Shopify offers a streamlined setup process to integrate payment gateways smoothly.
Configuring Payment Providers
Access Payment Settings: Navigate to the 'Settings' section within your Shopify Merchant Dashboard, and select 'Payments'.
Shopify Payments Activation: If you haven't chosen a credit card payment provider yet, complete the required information in the 'Payments' section. Should you already have a provider, simply activate Shopify Payments by clicking the respective option and following the prompts in the dialogue box that appears.
Banking Information: Enter and save your banking details to finalize the payment provider setup. This will enable the processing of credit card payments directly through your store.
Finalizing the Checkout Process
Store Policies: Add your store policies by copying and pasting them into the relevant section. Access this via 'Settings' > 'Policies' on your dashboard. After pasting, make any necessary adjustments to align with your Shopify store's practices, and save the changes.
Checkout Configuration: Under 'Settings', find and click on 'Checkout'. Here you can tailor the checkout experience to your business needs, determining what customer information is essential before purchases. Remember to save any modifications you make.
These steps are vital in ensuring a seamless transactional experience for your customers and a smooth operational flow for your store post-migration. With payment and checkout setup complete, your Shopify store is one step closer to being fully operational.
Step 7: Testing The Orders on Shopify
After setting up your payment providers, it's crucial to validate the functionality through test transactions. This not only familiarizes you with the customer purchase process but also ensures that every step from cart to confirmation functions flawlessly.
Conducting Test Transactions
Successful and Failed Transactions: Simulate both successful and failed transactions to check the robustness of your payment setup.
Refunds and Cancellations: Process a refund and cancel an order to understand the flow and ensure that the system correctly updates your inventory and financial records.
Order Fulfillment: Practice fulfilling and partially fulfilling orders to become acquainted with the logistics aspect of your Shopify admin.
Order Archiving: Archive a successful order to ensure that your order history is being properly maintained for future reference.
During these tests, observe the automated emails that Shopify sends to your 'customers'. If necessary, you can customize the email templates from the 'Notifications' page in your Shopify admin to better suit your brand's voice.
Step 8: Adding Your Team - Creating Staff Accounts on Shopify
A collaborative team can enhance your store's operations. Shopify enables you to add staff members to your store, granting each individual unique login credentials.
Setting Up Staff Accounts
Assign Permissions: When setting up staff accounts, you can assign specific permissions, controlling access to different sections of your store. This is essential to safeguard sensitive information and maintain operational security.
Staff Management: Familiarize yourself with the staff management features on Shopify to effectively oversee your team's access and roles within your store.
Step 9: Integrating Your Domain with Shopify
A crucial step in setting up your Shopify store is establishing your domain. Whether acquiring a new domain through Shopify or transferring an existing one, ensuring a seamless transition is key to maintaining your brand's online presence.
Acquiring a New Domain via Shopify
Purchase: Buy a new domain directly from Shopify to streamline the setup process.
Primary Domain Setup: Designate your Shopify-bought domain as the primary one to ensure it displays in customer browsers, search results, and social media.
Email Forwarding: Set up email forwarding to have messages sent to your custom domain email address redirected to a personal email, keeping communication lines open with customers.
Transferring or Connecting an Existing Domain
To keep your established domain while ensuring it points to your new Shopify store:
Prepare for Transfer: Disconnect the domain from your previous platform to avoid SSL certificate errors.
Adjust for Shopify’s URL Structure: Shopify’s page link structure may differ; prepare URL redirects for key pages to prevent customer access issues.
URL Redirects: Implement redirects for any old bookmarks or third-party links to direct to the new Shopify URLs, enhancing the customer experience and avoiding error pages.
Step 10: Transitioning to Shopify POS for In-Person Sales
For merchants with a brick-and-mortar presence or those utilizing a point-of-sale (POS) system, Shopify POS offers an integrated solution for in-person transactions.
Setting Up Shopify POS
Preparation: Ensure your staff, products, and physical locations are ready for in-person sales by setting up Shopify POS as an additional sales channel.
Hardware Compatibility: If migrating from another POS system, some of your existing hardware might be compatible with Shopify POS. Check Shopify's list of supported POS hardware to determine what can be reused, potentially saving time and resources.
By meticulously setting up your domain and Shopify POS, you're not just transitioning your online and in-person sales to a new platform – you're optimizing for efficiency and scalability.
Shopify Plus Benefits: Features, Costs, and When It’s Worth Upgrading
Shopify Plus is not simply a more expensive version of Shopify. It unlocks advanced checkout customization, higher API limits, native B2B, unlimited staff accounts, expansion stores, and stronger support. For the wrong brand, it is an expensive upgrade that sits half-used while the budget would have done more on UX, performance, or conversion work.
CHECK THE ARTICLE
Step 11: Improving Your Shopify Store with Strategic SEO
To ensure your Shopify store continues to thrive in search engine rankings post-migration, a thoughtful SEO strategy is essential. Focusing on redirects, meta descriptions, and sitemap submissions will maintain and potentially enhance your store's visibility online.
Implementing Effective Redirects
Redirects play a crucial role in preserving SEO rankings by guiding visitors from your old URLs to the new Shopify ones.
Setting Up Redirects: Navigate to Settings > Apps and sales channels in your Shopify admin. Under Online store, find Navigation and then View URL Redirects. Here, you can create redirects by specifying the old and new URLs.
Testing Redirects: After setting them up, verify by visiting the old URLs to ensure they lead to the correct Shopify pages.
Crafting Meta Descriptions
Meta descriptions serve as concise summaries in search results, influencing click-through rates.
Unique Descriptions: Each webpage, product page, collection page, and blog post should feature a unique meta description that succinctly communicates the content’s value.
Editing in Shopify: You can edit meta descriptions across your store from the Shopify admin, enhancing your site’s SEO appeal.
Sitemap Verification and Submission
A sitemap is a roadmap of your site that search engines use for indexing.
Automatic Generation: Shopify automatically creates a sitemap.xml file for your store, found at the root directory of your domain (e.g., yourstore.com/sitemap.xml).
Submission to Google: Submit your sitemap to Google Search Console to aid in efficient indexing. Note that search engines cannot access your sitemap if your site is password protected, so ensure any password protection is removed before submission.
Patience with Indexing: The indexing process can vary in time, with no guarantees from search engines on the timeline. Use the site: search operator in Google (e.g., site:yourstore.com) to check if your pages are being indexed.
By diligently setting up redirects, optimizing meta descriptions, and ensuring your sitemap is accessible to search engines, you position your Shopify store not just to retain but to grow its search engine presence, driving more organic traffic to your newly migrated site.
How Long Will The WordPress to Shopify Migration Take?
The time to migrate from WordPress to Shopify varies based on your store's size and complexity. Here's a general timeline to expect:
Small stores (under 100 products): 1-2 weeks
Medium stores (100-1000 products): 2-4 weeks
Large stores (over 1000 products): 4-8 weeks or more
Remember, these are estimates. Your specific timeline can be longer if you have custom features, complex product configurations, or large amounts of customer data to transfer. Your team's availability is also crucial – limited resources can extend the process.
A content audit before migration is necessary. It helps you identify what to move, leave behind, and what needs special attention. This upfront work can significantly improve your migration process and save time in the long run.
Plan for a post-migration adjustment period. You'll likely need extra time to fine-tune your new Shopify store, making sure everything works as expected and your team is comfortable with the new CMS system.
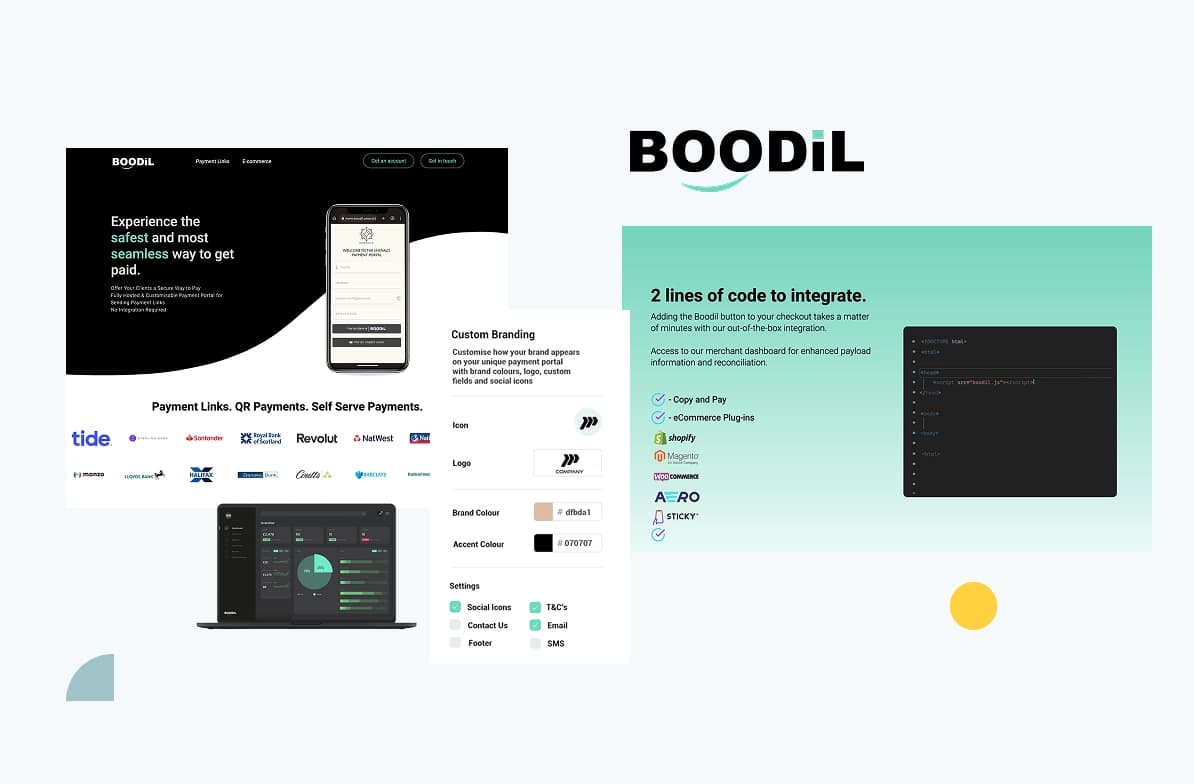
We built a secure Shopify payment app for Boodil that transformed them from a standalone payment processor into an approved Shopify partner, unlocking access to 3.5+ million stores across multiple markets.
3.5M+
stores unlocked
Multi-market
expansion
Shopify
payment integration
Will I Lose Any Data or Functionality When Moving From WordPress to Shopify?
When migrating to Shopify, you won't lose core business data, but some functionalities may need adjusting.
Data that typically transfers smoothly:
Product information
Customer data
Order history
Basic content pages
Areas that may need attention:
Custom plugins: WordPress plugins won't work on Shopify. You'll need to find equivalent Shopify apps or develop custom solutions. This might mean adopting new approaches to achieve familiar functionalities.
Theme features: Your WordPress theme won't transfer. You'll either choose a new Shopify theme or develop a custom one. Some unique features might require custom development to recreate in Shopify.
Product configurations: If you have complex product options or variations, you may need to reconfigure these to fit Shopify's product structure.
SEO elements: While these transfer, it's worth reviewing post-migration. Shopify has a different URL structure, so you might need to set up redirects and adjust your SEO strategy.
Remember, Shopify and WordPress have different architectures. Most functionalities can be recreated, but they might work differently on Shopify. Expect an adjustment period where you're fine-tuning your new store and getting accustomed to Shopify's way of doing things.
Migrate from WordPress to Shopify with a clear growth plan
Migrating from WordPress to Shopify is a chance to simplify ecommerce operations, improve store management, reduce plugin dependency, and build a storefront that is easier to scale. Shopify’s own migration guidance frames the process around careful setup, data transfer, redirects, payments, shipping, taxes, and post-launch checks, so the migration needs planning, not just a data export.
Shopify gives growing ecommerce teams a commerce-first platform with native checkout, payment processing, analytics, app ecosystem, integrations, and operational tools. Naturaily helps brands move to Shopify without carrying old problems with them: product and customer data, content, redirects, UX, SEO, integrations, and post-launch stability all need to be handled deliberately. If your WordPress setup is becoming harder to manage, contact Naturaily to plan a Shopify migration built around your business goals, not just a platform change.
Let's Build a Great Shopify Project Together
We'll shape your e-commerce the way you win it!